How to create a custom integration interface in SOA Gateway
This example will illustrate on how to develop a simple interface using PL/SQL. The Integration Repository will recognize integrations through annotations in the code (details about annotations can be found in the Integrated SOA Gateway Developer’s Guide, Appendix A).
- You can annotate *.pls and *.pkh files.
- For PL/SQL packages, only the package spec should be annotated. Do not annotate the body.
Example of a annotated package spec:
CREATE OR REPLACE PACKAGE xx_test_soagway AS
/* $Header: $ */
/*#
* This package returns different data from Financials (GL).
* @rep:scope public
* @rep:product gl
* @rep:displayname xx_test_soagway
* @rep:lifecycle active
* @rep:compatibility S
* @rep:category BUSINESS_ENTITY GL_ACCOUNT_COMBINATION
*/

/*#
* Returns CCID
* @param P_SEGMENT1 varchar2 Segment 1
* @param P_SEGMENT2 varchar2 Segment 2
* @param P_SEGMENT3 varchar2 Segment 3
* @param P_SEGMENT4 varchar2 Segment 4
* @param P_SEGMENT5 varchar2 Segment 5
* @return CCID
* @rep:scope public
* @rep:lifecycle active
* @rep:displayname Return CCID
*/
FUNCTION get_ccid (P_SEGMENT1 IN VARCHAR2,
                   P_SEGMENT2 IN VARCHAR2,
                   P_SEGMENT3 IN VARCHAR2,
                   P_SEGMENT4 IN VARCHAR2,
                   P_SEGMENT5 IN VARCHAR2) RETURN NUMBER;

END xx_test_soagway;
Note: The annotation BUSINESS_ENTITY is where in the Integration Repository your custom integration will be found. The below queries will help you find the correct BUSINESS_ENTITY. It’s not possible to add your own BUSINESS_ENTITYs in the current version.
SELECT * FROM fnd_lookup_assignments WHERE lookup_type = 'BUSINESS_ENTITY'SELECT * FROM fnd_lookups WHERE lookup_type = 'BUSINESS_ENTITY'
In the example above a package called xx_test_soagway is created with one function called get_ccid. The function will return a code combination id for the segment parameters that we are using in the request. The package body is saved on the local hard drive as xx_test_soagway.pls.
The next step is to create an iLDT file (Integration Repository loader file) that we should use to upload to the Integration Repository. The file is created with a tool called Integration Repository Parser (IREP Parser), the tool will validate the file against the annotation standards. Before the iLDT file can be created xx_test_soagway.pls need to be transferred to the server (as applmgr). In this case we will put the file in $GL_TOP/patch/115/sql and /tmp.
Run the command to generate the iLDT file:
$IAS_ORACLE_HOME/perl/bin/perl $FND_TOP/bin/irep_parser.pl -g -v -username=sysadmin gl:patch/115/sql:xx_test_soagway.pls:12.0=/tmp/xx_test_soagway.pls
Note: If you are generating a new iLDT file for an already uploaded interface you need to add a higher version number then the last uploaded.
$IAS_ORACLE_HOME/perl/bin/perl $FND_TOP/bin/irep_parser.pl -g -v -username=sysadmin gl:patch/115/sql:xx_test_soagway.pls:12.1=/tmp/xx_test_soagway.pls
When the iLDT file is successfully created we can upload it to the Integration Repository using:
$FND_TOP/bin/FNDLOAD apps/apps 0 Y UPLOAD $FND_TOP/patch/115/import/wfirep.lct xx_test_soagway_pls.ildt
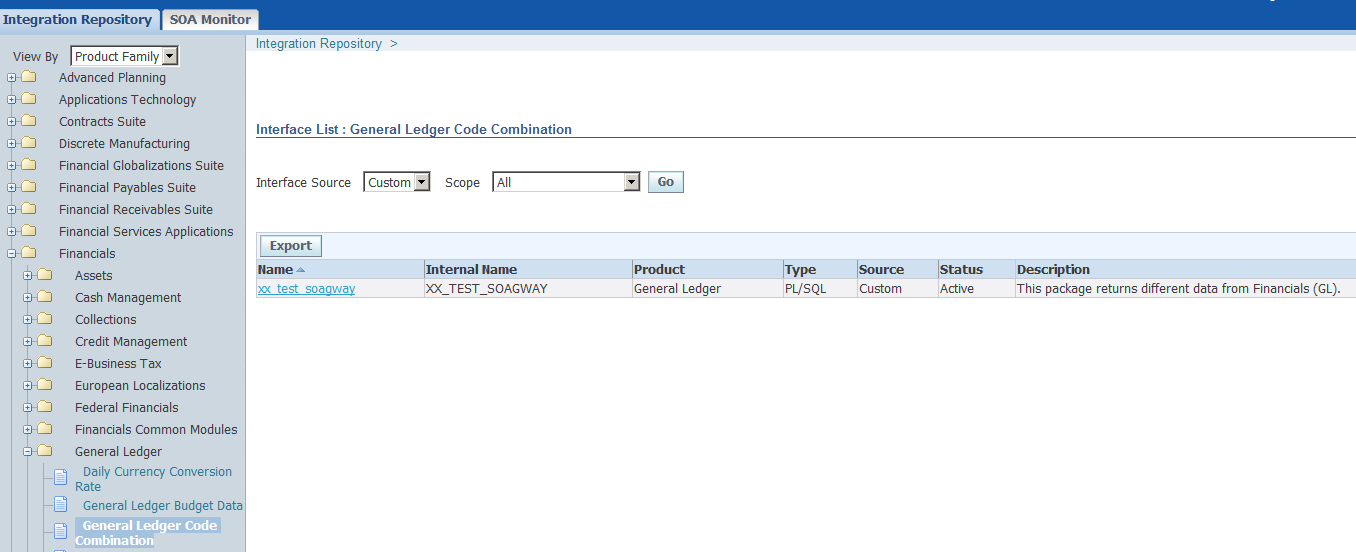
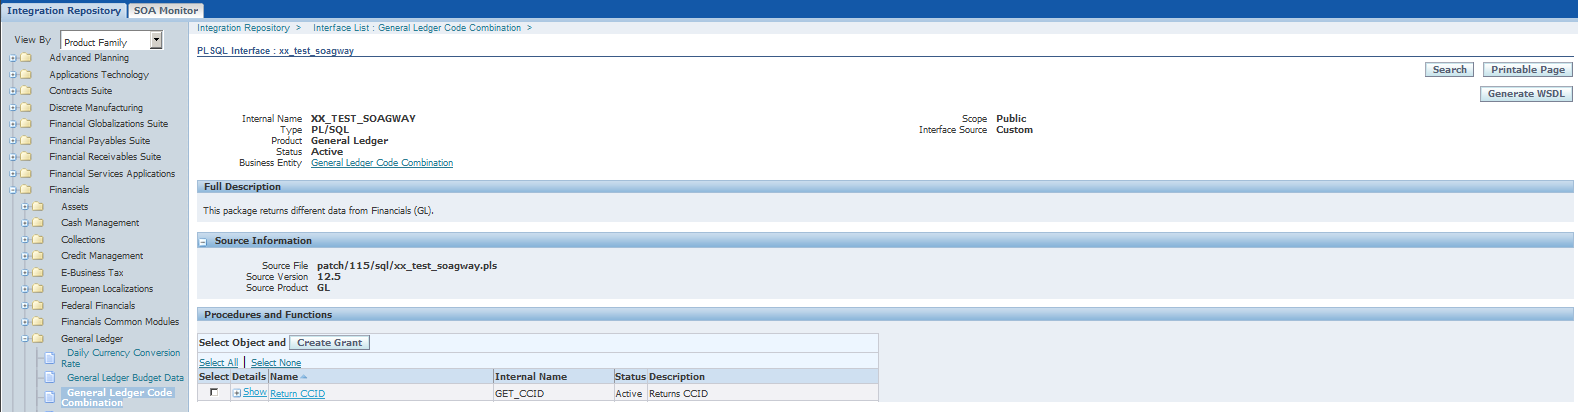
Successfully uploaded to the Integration Repository
Now the package needs to be created in the database
CREATE OR REPLACE PACKAGE xx_test_soagway AS
/* $Header: $ */
/*#
* This package returns different data from Financials (GL).
* @rep:scope public
* @rep:product gl
* @rep:displayname xx_test_soagway
* @rep:lifecycle active
* @rep:compatibility S
* @rep:category BUSINESS_ENTITY GL_ACCOUNT_COMBINATION
*/

/*#
* Returns CCID
* @param P_SEGMENT1 varchar2 Segment 1
* @param P_SEGMENT2 varchar2 Segment 2
* @param P_SEGMENT3 varchar2 Segment 3
* @param P_SEGMENT4 varchar2 Segment 4
* @param P_SEGMENT5 varchar2 Segment 5
* @return CCID
* @rep:scope public
* @rep:lifecycle active
* @rep:displayname Return CCID
*/
FUNCTION get_ccid (P_SEGMENT1 IN VARCHAR2,
                   P_SEGMENT2 IN VARCHAR2,
                   P_SEGMENT3 IN VARCHAR2,
                   P_SEGMENT4 IN VARCHAR2,
                   P_SEGMENT5 IN VARCHAR2) RETURN NUMBER;

END xx_test_soagway;

create or replace
PACKAGE BODY xx_test_soagway AS

  FUNCTION get_ccid (P_SEGMENT1 IN VARCHAR2,
                     P_SEGMENT2 IN VARCHAR2,
                     P_SEGMENT3 IN VARCHAR2,
                     P_SEGMENT4 IN VARCHAR2,
                     P_SEGMENT5 IN VARCHAR2) RETURN NUMBER AS

  v_ccid    NUMBER;

  BEGIN

    SELECT code_combination_id INTO v_ccid
    FROM gl_code_combinations
    WHERE NVL(segment1, ' ') = NVL(P_SEGMENT1, ' ')
    AND   NVL(segment2, ' ') = NVL(P_SEGMENT2, ' ')
    AND   NVL(segment3, ' ') = NVL(P_SEGMENT3, ' ')
    AND   NVL(segment4, ' ') = NVL(P_SEGMENT4, ' ')
    AND   NVL(segment5, ' ') = NVL(P_SEGMENT5, ' ')
    AND   enabled_flag = 'Y';

    RETURN v_ccid;

  EXCEPTION
    WHEN no_data_found THEN
      RETURN -99;
    WHEN too_many_rows THEN
      RETURN -90;
  END get_ccid;
END xx_test_soagway;
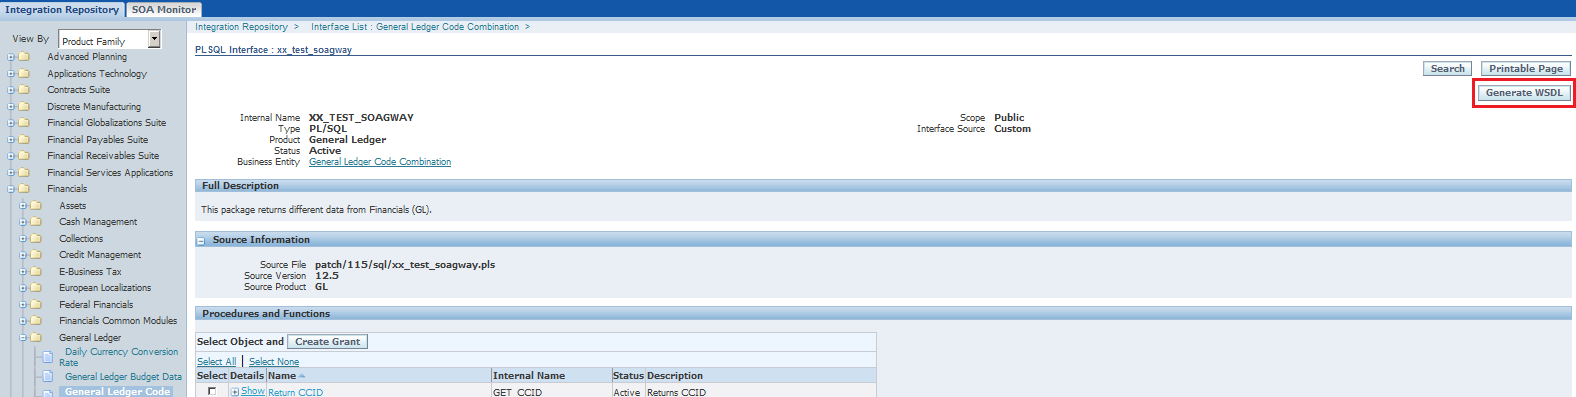
When the code have been successfully compiled we need to service enable the new integration interface. Go back to the xx_test_soagway PL/SQL interface and click on the button Generate WSDL.
After the generation of the WSDL a link will appear in the interface page. The next step is to deploy the web service and is simply done by clicking the Deploy button.
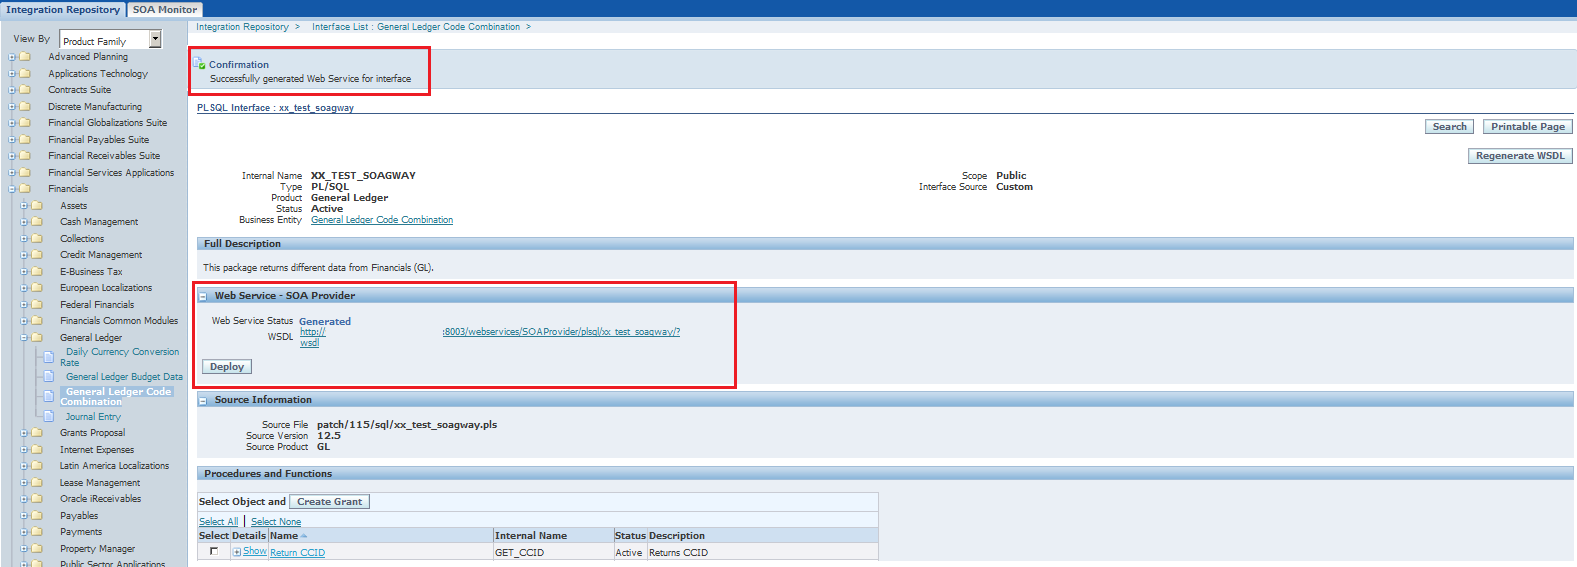
When the web service is deployed it is possible to Redploy and Undeploy the service.
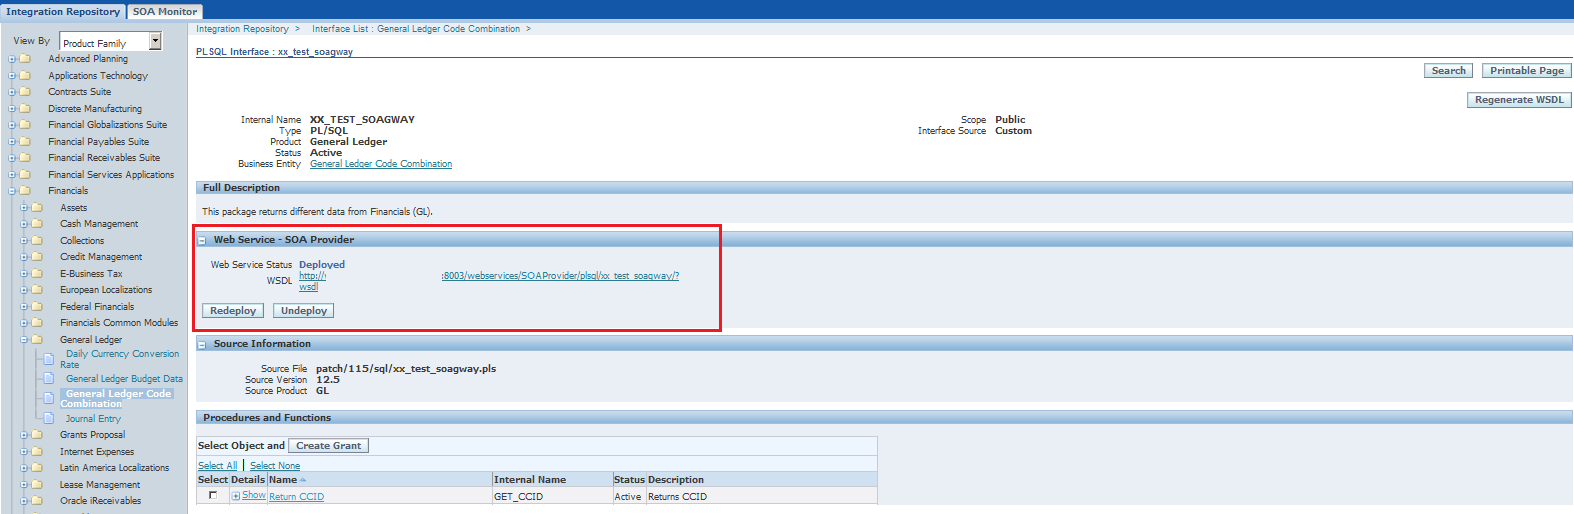
The last thing before we can invoke the web service is to set the Grant, this is done by clicking the Create Grant button.
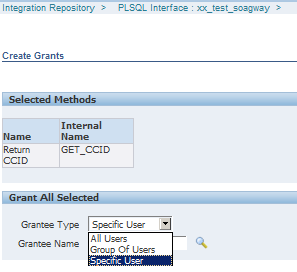
In this example set the Grantee Type to All users.
Before the web service can be invoked we need to restart the Application server and clear the cache.
Restart
cd $INST_TOP/admin/scripts
adoafmctl.sh stop
adoacorectl.sh stop

adoafmctl.sh start
adoacorectl.sh start
Clear cache
Use responsibility Functional Administrator and go to Core Services -> Caching Framework -> Global Configuration -> Clear all cache.

Now the web service is deployed and ready to be invoked.
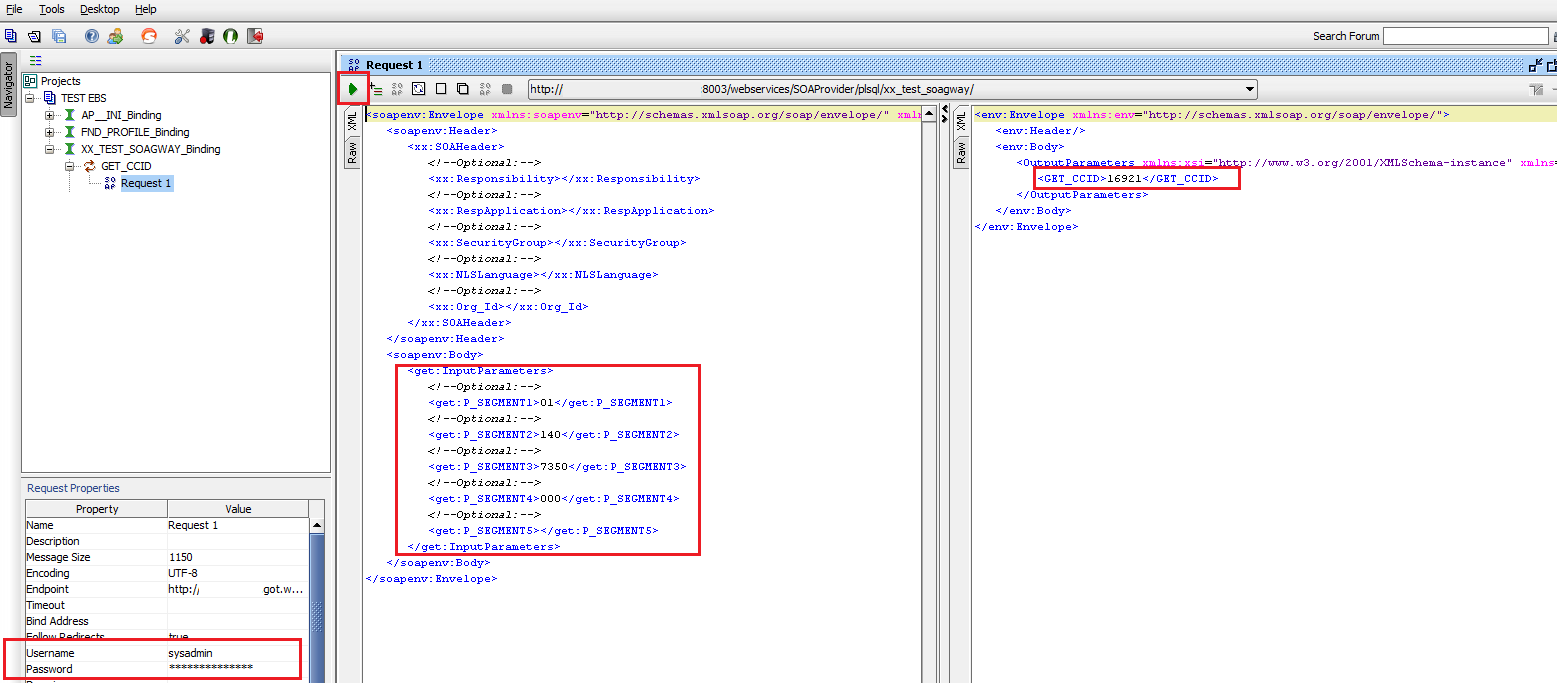
By using the tool soapUI it is easy to unit test the newly created service (download from www.soapui.org).
Open soapUI and create a new project.
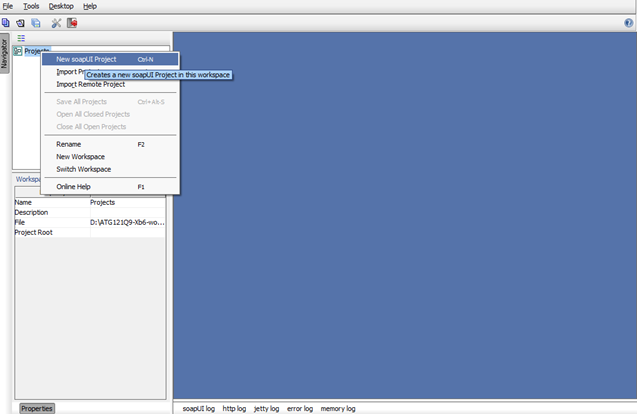
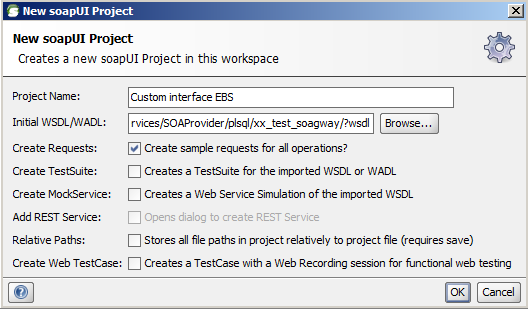
Paste the WSDL link from the E-Business Suite Integration Repository and select some options in the SOAP UI new project dialog.
Add username and password (enduser in E-Business Suite, encrypted password not supported at the moment) and add parameters for segment 1-5. Then click the submit request (top left corner in Request 1 window) to invoke the web service. The response will be shown in the right side of the window.
Sources
- Integrated SOA Gateway Developer’s Guide (February 2010)
- Oracle E-Business Suite R12.1 – Integrated SOA Gateway Provides Native, Out-Of-The-Box SOAP Based Web Services
- Integration Repository Customization
- Oracle E-Business Suite – Integration